For many people, the backyard is their ultimate escape, so it needs to look perfect. One of the hardest parts about creating the ideal landscape is making your backyard edging look professional without having it professionally done. Some people may be looking to save money by doing their own landscaping, while others genuinely enjoy doing the work themselves. No matter the reason, doing it yourself is not as daunting as it seems.
What is Backyard Edging?
At its heart, edging is a border meant to separate two areas for functional or aesthetic reasons, but it is so much more than that. The idea of edging is to create a barrier between areas when flora should be growing and areas where it shouldn’t. These barriers prevent grass and weeds from creeping into your garden, landscaping, or driveway. In more recent times, edging has retained its original purpose, but it is also being used as part of your yard’s overall curb appeal. There are many types of backyard edging out there that promise both fashion and function.
What Types of Edging are There?
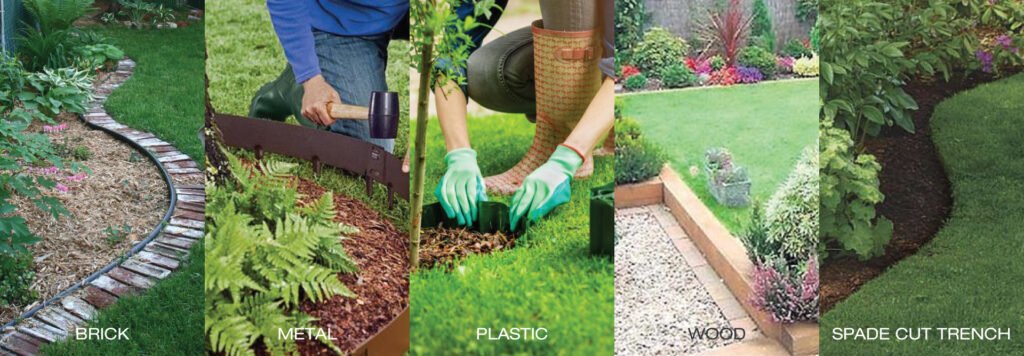
The first step in professional-looking edging is choosing the right material. There are several different types of garden edging from which to choose.
 Bricks and Pavers
This type of backyard edging is popular because it gives a clear border between the grass and your landscaping. These large stones or bricks add contrast with both texture and often make a visible barrier between the lawn and landscape. Aesthetically, they are one of the more popular options, but they are not the easiest option to install — though a competent DIYer shouldn’t have a problem, it will just take a little longer.
Plastic Edgers
These are popular because they get the job done, and they are quick and relatively easy to install. They come in many shapes and sizes, but one of the most popular options is a long strip of thick plastic with rounded edges. This option is popular because it is inexpensive, relatively easy to install, and not easy to see from the curb. The only downside is that they aren’t an excellent barrier to prevent debris from your yard from getting into your landscaping.
Metal Stakes
These also come in a plastic variety, but the metal ones are more popular because of their durability. Unlike thin tent stakes, these are wide, often with rounded edges on top. They are straightforward to install with only a mallet needed to pound them in with the right ground conditions. The only downsides to these are that they are challenging to get even, and they have a somewhat industrial look to them, which some people may not like.
Wood
You can go with two directions with wood, the first being traditional lumber, which is installed similarly to stone or brick but won’t last as long. The other option that some people choose is using natural logs to create their edging, which looks more natural and will last a lot longer than a 2 x 4. While you can place logs as edging with no extra effort, significantly heavier logs, it is a good idea to dig a shallow trench to make sure the logs don’t roll away on you.
Spade Cut Trench
This is the easiest of all the options because it is literally a hole filled with mulch. You cut an angled trench between the grass and the landscaping, then fill it with mulch.
Preparation
Before creating an epic edge, you need to make sure that your yard and landscaping are both ready for the job.
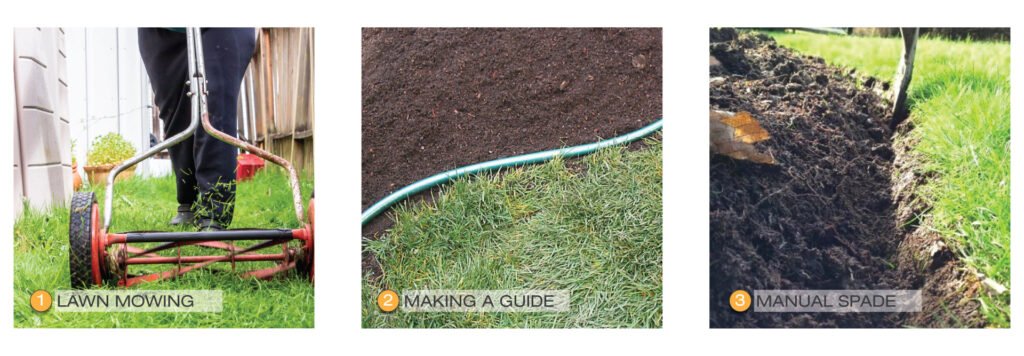
 Mow First
Having a freshly cut lawn will give you a frame of reference of where your grass should be to accentuate your edging best.
Create a Guideline
Turn your string trimmer sideways – some newer trimmers have an edging function built-in for this purpose. Move from left to right as you create the guideline and move slowly to ensure the straightest line possible if you are edging against a hard surface like a driveway, take advantage of the natural separation between the two surfaces by keeping the string as close to the driveway as possible.
Use a Manual Spade
Now that you have a guideline, you can use a hand spade to dig out an appropriate width and depth for the type of border you are installing.
Installation
Edging installation is based totally on the edging you are installing, but there are a few universal rules to follow when installing the border.
- Before you install, go over your line or trench one more time to ensure that it is as straight and level as you want it.
- Collect all of the supplies you need before you start, including masonry cement if you use brick or pavers, a mallet, protective eyewear and gloves, and a level.
- Install your edging, according to the manufacturer suggested.
- Take your time and often check that your edging is level, especially if you are using something like brick, which will be much more difficult and expensive to fix a mistake.
- Clear away any debris on both sides being cautious about pushing any grass toward the lawn, so it doesn’t mess up your new landscaping and edging.
What Not to Do
Sometimes, making your lawn edging look like a professional job has less to do with what to do and more with what not to do. Don’t fall into the trap of these typical DIY garden edging mistakes.
Don’t Eyeball It
Creating a professional-looking lawn edge is time-consuming, and there is a temptation to cut corners to get it done faster, but that is a bad idea. It is cliché, but there is a reason for the adage “measure twice, cut once.” Measure and level for edging often to make sure that everything is even and level; otherwise, you may cost yourself precious time by having to redo areas later. s
Don’t Buy Cheap Material
Edging material comes in all kinds of shapes, sizes, and price points, but it is one of those things that is worth spending a little more money on. Cheap material will not last nearly as long in the ground if you can even get them there without them falling apart on you. It is better to spend a little extra upfront for a professional look and less headache down the line.
Don’t Go Too Shallow
Grass roots run surprisingly deep, and if your border isn’t deep enough, they will eventually crawl under it and creep up in your landscaping. Most landscaping trims are specifically designed to prevent such an occurrence, but it is best to make sure you start deep enough if you are using unconventional material.
Don’t Mess Up the Connectors
This is just for plastic landscaping strips. Most strips come in lengths of twenty feet, and you can cut them to the size you need. If your project requires more than twenty feet, you can purchase connectors to connect the strips. These connectors are usually about eight inches in length, and people run into issues when they don’t connect the two strips evenly in the connector. There should be four inches from each strip in the connector, or you run the risk of one of them popping out underground and forcing you to dig the whole thing back up to fix it.
How Much Does Edging Cost?
There is no set price for the cost of doing your backyard edging yourself because it all depends on what material you are using and how many tools you already have at your disposal. Tools for edging can cost anywhere from under fifty dollars for a manual edging tool to a few hundred dollars for a gas-powered machine explicitly designed for the job.
Edging materials range even wider in price, but remember that you get what you pay for with these materials. In some cases, the material could be free if you choose to use fallen trees for your backyard edging. Plastic and rubber strips are popular because they are cost-effective, ranging from the low teens to around fifty dollars per strip. Pavers and stone will cost you in the hundreds of dollars, and that is before you buy the masonry cement to band them together.
Maintenance Tips
Weed regularly
The best way to keep your edging looking professional is to get rid of any stray weeds that make it look like it’s not doing its job.
Bag it Up
Mow regularly and use a mower with a bag to prevent problematic grass from taking root in your landscaping.
Trim in the Right Direction
The key is to keep unwanted material from landing in your landscaping, so you many to trim in a direction that sends grass clippings back into the yard.
Inspect Edging Regularly
It doesn’t have to be every time you mow, and it all depends on the edging you use. For instance, plastic or rubber edging should only need to be inspected after the winter in climates where the ground freezes to make sure the frost hasn’t pushed the edging out of the earth. On the other hand, Stone edging should be checked weekly to ensure that weeds aren’t growing up in between the masonry cement.
The Clean Up
Making your backyard edging look professional and well-groomed isn’t so much about having an inherent talent; it’s more about have the right tools and material along with a lot of patience. Lawn edging is one of the most meticulous chores to do in your yard, but when done right, it makes your yard look like something out of a magazine. The hardest part is getting it installed in the first place, but after that, some minor maintenance here and there will make you look like you hired a professional.


Comments are closed.