Are you an RC car enthusiast? Then nothing can give you extreme pleasure than building an RC car-racing track in your backyard. Building your RC racing track is a gratifying project you can undertake when you experience such as phase. Ensure that you have a large, flat, and clear area where you can create your track. Apart from the site, there are no such rules for building your RC track in your backyard. You can go creative with your design and include some fun obstacles such as jumps and berms. Building your RC car-racing track requires hard work where you will have to utilize your elbow grease, and hence, it is advisable to seek the help of your friends to help you with the labor. Are you wondering how to build a flawless track to pursue your hobby of racing a radio-controlled car? Here is a systematic guide that you can follow to develop an RC track in your backyard.
Stage 1: Planning the RC Car-racing Track
 Before building an RC car-racing track, ensure that you know what you want from the design. If you used or saw RC racetracks in the past, retrieve them in your mind and consider the parts you disliked. It will help you better understand what you did and did not like about the racetracks. Plan how your RC track will be different from the ones you saw before.
Creating the Plan
Before building your desired racetrack in your backyard, ensure to have a detailed plan. When you have a detailed plan at hand, you will likely experience fewer issues and prevent you from starting the track right from scratch. However, it does not mean that you cannot make minor adjustments when you feel inspires, but you have an idea of what you are building. The first thing you need to consider is the type of racing you will conduct on the track. Next, consider the size of the cars, which would change the suitable size of the entire track.
Determining the Lane Width
When you are determining the width of the lanes, you need to consider a few factors. The most significant benefit of designing your racetrack is that you have your rules. You can have wide lanes with lots of twists and turns and as many jumps as you desire. The width of the lane depends completely upon the space you have and your preference. Moreover, you also need to consider the number of cars you are planning to race at once. Ideally, the width must be a couple of feet to give you plenty of room to whip the turns without jumping off the banks.
Planning Around the Obstacles
If you own a large backyard with plenty of space, you might not want to run into any obstacles. However, if the space has uneven ground, rocky areas, or large trees, you must remove these barriers before building the car-racing track. While making the track around the trees might seem a fun obstacle, a wrong turn during the race will end up in a broken race car.
Another option is to add a hefty dirt ramp around the tree. The dirt ramp acts as a cushion to your car during an accident. If you want a clean area, removing the bushes and trees is the best option. However, if you plan to leave the tree, you need to trim down the hanging branches that might cause severe obstacles in vision and while you make jumps and turns.
Step 2: Preparing the RC Car-racing Track
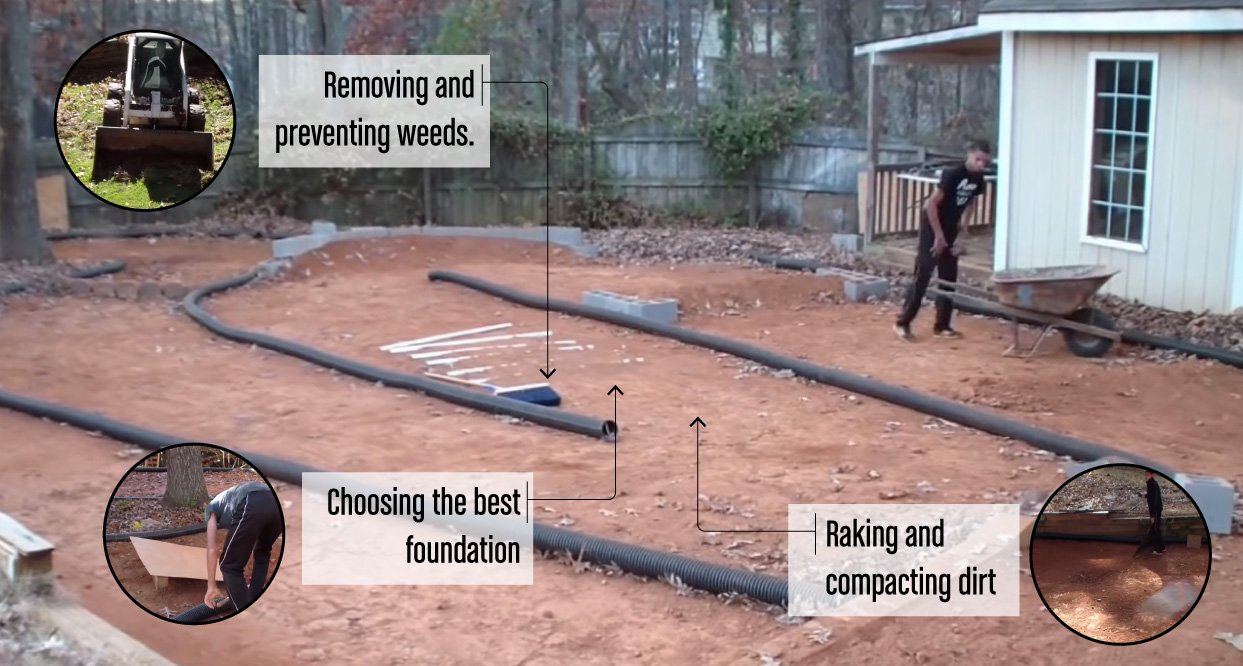
 Removing and Preventing Weeds
Your track might take a few weeks. You can periodically go and remove them to keep the track clean. Alternatively, you can spray weed killer.
Raking and Compacting Dirt
Over time, the foundation of your track might change. Ensure to go through the track and rake through the dirt and even them out. Once you find everything looks nice and even, you can use the lawn roller or shovel to compact the soil.
Handling Drainage
Once your tack receives good rainfall, you will start noticing puddles of water. To combat the issue, create small trenches to the side, which allows the water to escape.
Removing Turf
If your land has turf, try removing it and start with a good foundation. You can also use a shovel to remove the grasses. Ensure that you do not remove too much dirt underneath the grasses, as you want the lanes to be deeper than the surrounding. Alternatively, you can rent a sod cutter from your nearby hardware store. Ensure to save some turf as you dig, which you can use in building the jumps.
Choosing the Best Foundation
While you can use the topsoil of your backyard as your foundation, we recommend you not use it. It is because the topsoil is hard to maintain, and lousy weather would damage your racetrack. We recommend using clay, as it is firmer and easier to pack. Besides, clay offers you a solid foundation for your racers.
Alternatively, you can dig deep into the ground using a shovel until you get hard ground. However, if you are choosing this option, ensure that the ground is nicely packed. You can use a lawn roller to pack the soil.
Stage 3: Construction
Ensure that the track has proper drainage, which protects you from flooding and prevents repairing several times.
Building the RC Car-racing Track
Start building the track by digging your foundation. As you dig, use the dirt to form the edges. You can keep some extra dirt handy for creating the walls. Ensure that the walls are neither too large nor too angled.
Adding the Jumps
After building the turns, start adding the jumps as you have in your design plan. While you build, test the jumps and ensure that everything rinds smoothly. Doing so will help you adjust and perfect as you progress instead of coming back and making the adjustments later. If you want larger jumps, try to use the turf you dug at the beginning of the process. Now top the jumps with dirt or clay. Ensure that you covered the turf underneath well with dirt or clay.
A great way to build jumps is by piling up the turf at the bottom and placing the dirt with a shovel. Once you make the jump according to your desired size, gently shave it with the rake. The pile of dirt must be even on both sides, which slopes gently downwards. Lastly, compact the jumps with a flat shovel. Remember, the final jump will have a smaller size after compacting.
Lining the Lanes
After digging out the track and banks, you can start lining the lanes. Place the four-inch corrugated pipe and secure it to the ground. Drive twelve-inch galvanized nails through the pipe into the ground at regular intervals to hold the lanes in place.
Creating the Sign
You can make your racetrack official with a name and a sign. After you come up with the perfect name for your racetrack, you can print the text in the font you want on a piece of paper. Depending upon the size of the sign you desire, you require sheets of paper. After printing the letters, cut them out and trace them on the sign. Alternatively, you can also purchase some letter stencils for your sign.
Conclusion
Learning and building an RC racetrack in your backyard is a fun and exciting project, as you get so much room for personalizing. Ensure to make the track ahead of time and avoid any mishaps along the way. Although your RC track would not happen overnight, however, if you have the end goal in mind, you can start building your fun-filled RC racetrack.


Comments are closed.